Tag: Windows 11 Taskbar Transparent
There are a good number of ways that you can follow to get the transparent Taskbar on your Windows 11 PC. You have the choice to use tools that are present within the operating system or you can choose to use third-party tools to get the transparent taskbar effect. Let’s take a look at the different methods that you can choose to follow to make your Taskbar transparent.
Note: Method 5 is the recommended one. After applying any method, restart your PC (if mentioned) and then go to the homepage to check if the Taskbar is transparent or not.
Method 1: Enable Visual Effects Transparency Option
One way to get the transparency effect for your Taskbar on your Windows 11 PC is by making use of the Visual Effects settings and enabling Transparency. Check out these steps.
1. Launch the Start Menu and then open the Settings app.
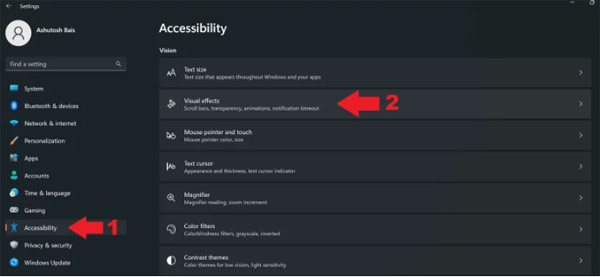
2. Now, click on the Accessibility tab from the left section of the Settings app.
3. On your right, you should see the Visual Effects option. Click on it.
1. Launch the Start Menu and then open the Settings app.
2. Now, click on the Accessibility tab from the left section of the Settings app.
3. On your right, you should see the Visual Effects option. Click on it.
4. Make sure to enable the Transparency Effects toggle.
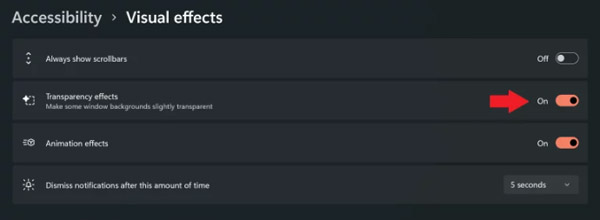
5. The Taskbar should now display the Transparency Effect right away. It works only on some backgrounds.
Method 2: Enable Transparency Effects
Another way to get the transparency effect for all the window borders and also for your taskbar is by enabling the transparency effect in Windows 11. Follow these steps.
1. First, open the Start menu on your PC and click on the Settings app icon.
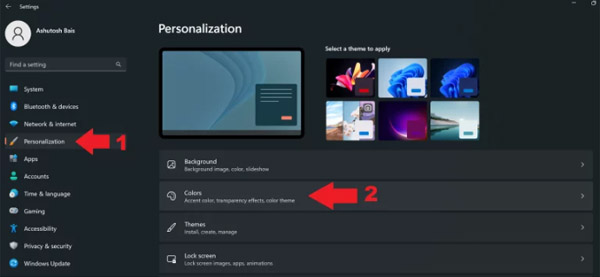
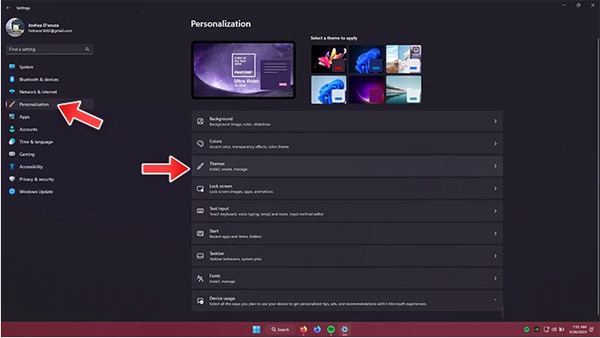
2. Now, click on the Personalization tab from the left-hand side.
3. Choose the Colors option in the Personalization screen.
4. You should see the Transparency Effects option. Click on the toggle to switch it on.
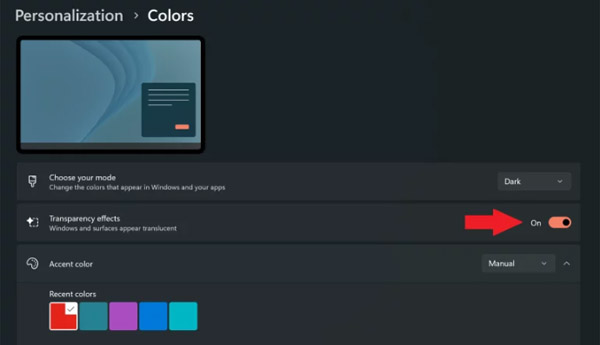
5. You will now see the transparency effect appear on the window borders as well as your Taskbar.
Granted that this isn’t full transparency, but it definitely gets some part of the job done.
2. In the text field, type in Regedit and hit the Enter key.
3. Now that the Registry Editor has opened, navigate to the following path (HKEY_LOCAL_MACHINESOFTWAREMicrosoftWindowsCurrentVersionExplorerAdvanced)
4. Make sure to paste the above address into the Address Bar of the Registry Editor window and press Enter.
1. First, open the Start menu on your PC and click on the Settings app icon.
2. Now, click on the Personalization tab from the left-hand side.
3. Choose the Colors option in the Personalization screen.

4. You should see the Transparency Effects option. Click on the toggle to switch it on.

5. You will now see the transparency effect appear on the window borders as well as your Taskbar.
Granted that this isn’t full transparency, but it definitely gets some part of the job done.
Method 3: Enable Transparency Using Registry Editor
The Registry Editor in Windows 11 can let you easily adjust a number of settings with just a few clicks. However, we recommend that you follow this method only if you know what you are doing. The Registry Editor has been featured numerous times when it comes to making certain changes whose settings are not available within the Settings app. So, if you would like to get a transparent Taskbar using registry Editor, follow these steps.
1. Press the Windows and R keys on your keyboard to open up the Run dialog box.2. In the text field, type in Regedit and hit the Enter key.
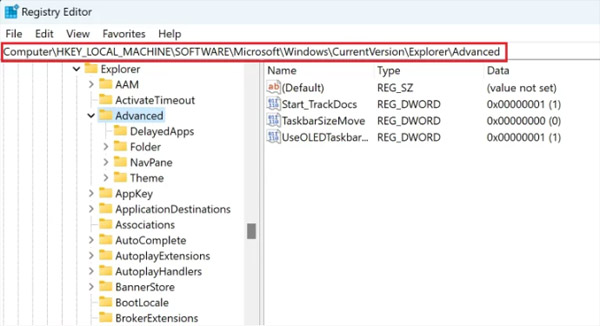
3. Now that the Registry Editor has opened, navigate to the following path (HKEY_LOCAL_MACHINESOFTWAREMicrosoftWindowsCurrentVersionExplorerAdvanced)
4. Make sure to paste the above address into the Address Bar of the Registry Editor window and press Enter.
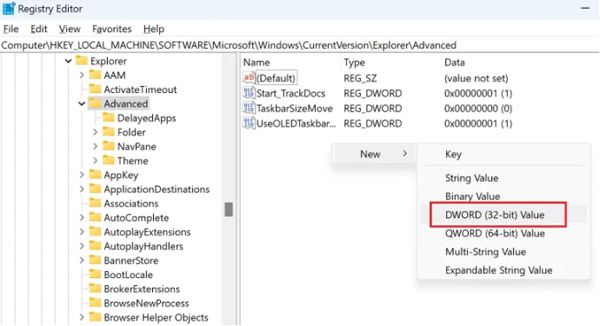
5. On the blank space on your right, right-click and choose New. Select the DWORD (32-bit) Value.
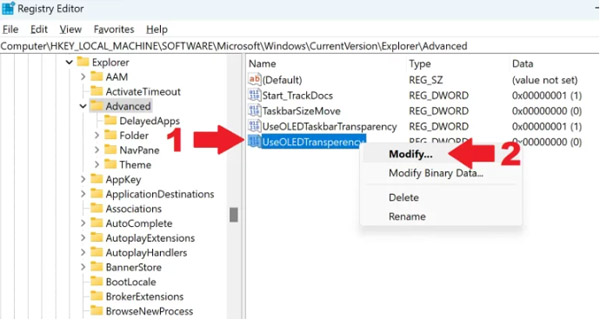
6. Now name the newly created DWORD as UseOLEDTransperency.
7. You need to right-click on UseOLEDTRansperancy and choose the Modify option from the context menu.
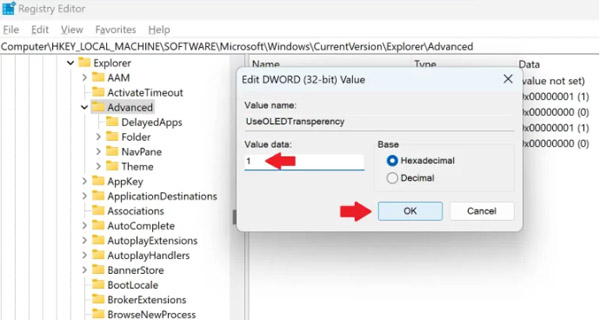
8. Simply change the Input Value from 0 to 1 and click on the Ok button.
9. To see the changes take place, restart your Windows 11 PC.
10. Once you restart your Windows 11 PC you should see the transparent Taskbar.
Method 4: Enable Taskbar Transparency With ViveTool
When it comes to customizing your Windows 11 PC or enabling features that haven’t rolled out to all Windows 11 users, the best tool that has come in handy for the users is the ViveTool. This is a small little free tool that doesn’t require much adjustment or modification. Here are the steps to use Vivetool to get a transparent Taskbar.
2. Once you have the zip file on your PC, extract the folder and place its contents in a folder that you can easily navigate to.
3. In this case, we will name the folder Vive. Keep the folder in C Drive.
4. Now, open the Start Menu and search for Command Prompt. When you see it in the results, make sure to run the program as Administrator.
5. Type in cd C:VIVE. Replace VIVE with the name of the folder you created to store the contents of the ViveTool zip file.
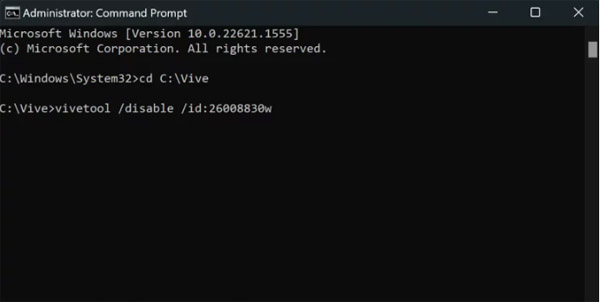
6. Hit the enter key and now type the(vivetool /disable /id:26008830w)
7. Once you have typed it, hit the enter key, and restart your Windows 11 PC.
8. After restarting, you will notice that your Taskbar now has the transparent effect enabled right away.
Method 5: Enable Transparency using StartAllBack
If none of the above methods have given you a satisfactory result or if they didn’t work quite right, you can still get your Transparent Taskbar by using a third-party app. Aptly called Startisback, this third-party program was created to give users the chance to make use of the old schools’ Start Menu and many other Taskbar customization options. You can follow these steps to get a fully transparent Taskbar on your Windows 11 PC.
2. Once the program is downloaded, run the program using Administrative privileges.
3. The moment you run the program, you will be able to choose the Start Menu theme.
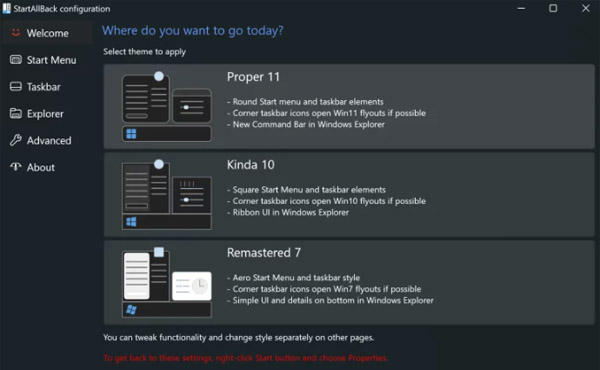
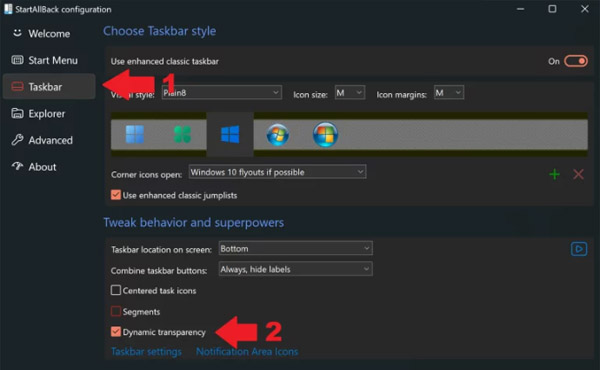
4. On the left side of the program, you will see the Taskbar tab. Click on it.
5. At the bottom, you will see an option that says Dynamic Transparency.
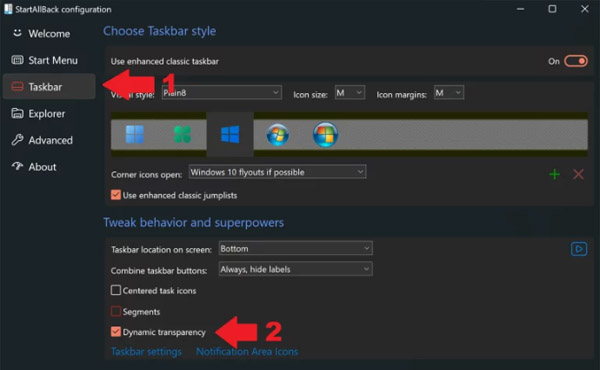
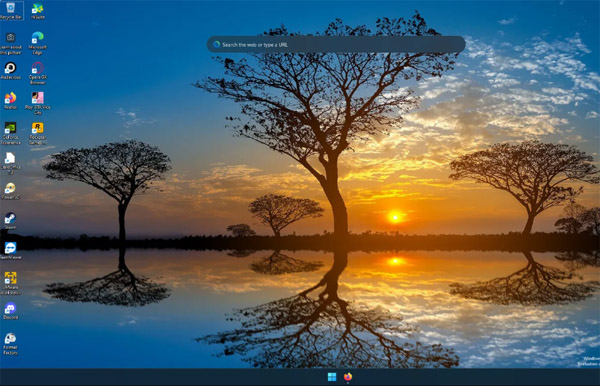
6. Select the checkbox next to Dynamic Transparency. You will now see that your Taskbar is very transparent and you can see the desktop’s wallpaper pass through the Taskbar.
That’s it!
This concludes the guide on how you can easily get yourself a nice transparent Taskbar on your Windows 11 PC. There used to be other apps but some of these apps are broken or unsupported on Windows 11. In the meantime, making use of StartisBack is a great way to get a clear Taskbar for free with just a single click. If you have questions or queries, feel free to leave them in the comments section below.



![[tool] RealWorld Cursor Editor 2012.1](/uploads/allimg/120615/1_0615113H32422.jpg)